• about
  • contact

Written Reality

smart MOM solutions for REAL family fun

  • Home
  • Faith
  • Food
    • Meal Planning Made Easy
    • Dinner
    • Desserts
    • Finger Foods
  • Favorites
  • Family Fun
    • Kids Play
    • Homemaking
  • How To Blog Resources
    • Blogging 101

DIY Wreath For All Occasions STEP TWO

8 May, 2013 | 2 Comments

Let's share. . .Share on buffer
Buffer
Share on email
Email
Share on pinterest
Pinterest
Share on facebook
Facebook
Share on google
Google
Share on twitter
Twitter
Share on linkedin
Linkedin
Share on stumbleupon
Stumbleupon
Share on yummly
Yummly

If you're new here, you may want to follow me on Pinterest, too. Thanks for visiting!

This post may contain affiliate links. Please see my full disclosure policy for details.

Now that you have your cardboard ring ready for your Reversible Wreath, it’s time to get creative and have fun. This is the step where you can experiment to create your own pattern–depending on the materials you have and the season or holiday you want to celebrate.

DIY Wreath For All Occasions STEP TWO

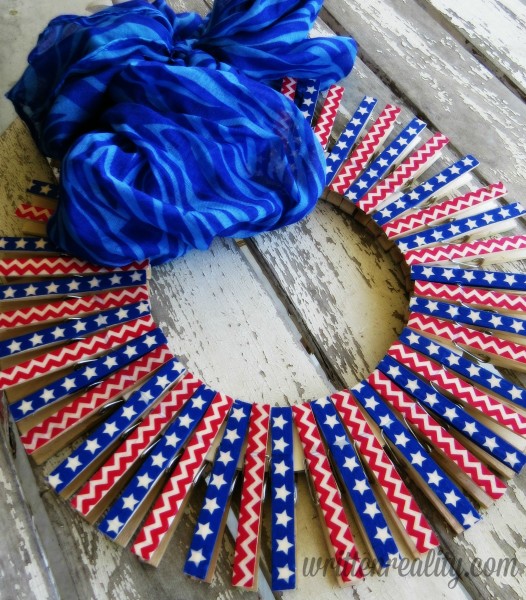
For this step, you’ll need the clothespins and the Washi Masking Tape . I love all the wonderful patterns and colors available, and how easy the tape is to use. The tape is flexible and easily peels on and off. So don’t worry too much about getting it right the first time. 

patriotic-washi-tape-wreath


Step Two: Create Your Pattern With Clothespins

Place the clothespins on the ring and spread them out until you are satisfied with its shape. Then, one by one, remove a clothespin and add the Washi Tape, so that you keep up with your pattern as you go.

This step takes the longest, but it’s really a simple one. I actually watched TV while doing it.

I like to line the tape up against the edge of the clothespin where the metal fastener juts out slightly. That way, I can easily run scissors down the other side and snip the ends for a perfect fit.

Remember, this wreath will be reversible. So you only need to cover one side–for now.

Using your fingernail, smooth out the tape and make sure it’s securely sealed on top and along the edges.

Ready to continue?

Let’s move on to STEP THREE!

Click Here to Continue→

Mitzi@WrittenReality


Filed Under: Family Life

Leave a Reply Cancel reply

Your email address will not be published. Required fields are marked *

Recipe Rating


This site uses Akismet to reduce spam. Learn how your comment data is processed.

  • Facebook
  • Instagram
  • Pinterest
  • Twitter

Amazon Associates Discloser

Written Reality is a participant in the Amazon Services LLC Associates Program, an affiliate advertising program designed to provide a means for sites to earn advertising fees by advertising and linking to amazon.com. Since prices often change on Amazon, I do not share exact prices on my site. 

This blog does not contain any content which might present a conflict of interest.

Copyright © 2025 · Runway Pro on Genesis Framework · WordPress · Log in · Privacy Policy